
Let’s walk through a few steps to set up Range so your team can get up and running smoothly.
Topics covered in this help article:
- Create your team: This is the first step in unlocking everything else Range has to offer.
- Set up Check-ins: Get started with Range’s primary communication tool to help decrease meeting time and increase alignment.
- Link Range to your other tools: Streamline your team’s workflows and keep track of all your work, across tools, in one place.
1. 👥 Create your team in Range
Creating your team is the first step to unlocking everything Range has to offer.
Teams in Range provide a central hub for your group where you can see who’s working on what and keep track of goals, trends, and other team topics over time. When you create a team, Range also helps streamline communication so you can all stay in sync.
To create your team in Range, click the “+” icon next to “My teams” in the menu on the left side of the page.

Then, add a name and an emoji for your team. (You can also invite teammates and adjust your check-in schedule on this screen — but we recommend coming back to do these things a little later on.)
💡 Name your team something people will recognize
When naming your team, it’s best to use something that folks across your organization can recognize so that it’s easy to find and follow your team’s work.
Now that you’ve created your team, we’ll go over a few ways to tailor Range’s features to help your team get the most out of them.
2. 📝 Set up Check-ins
Check-ins are the primary tool teams use to communicate in Range. At their core, they’re asynchronously-shared status updates that show what individuals and teams are doing, what they need, and how they’re feeling.
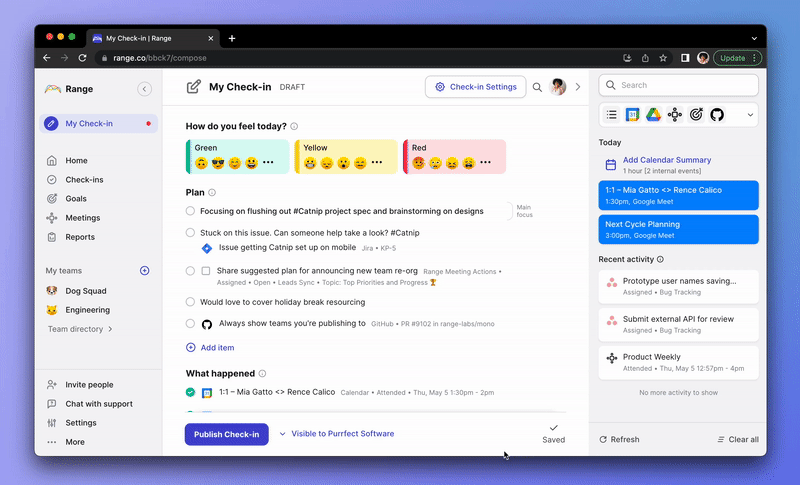
Here’s what a Check-in looks like.
💭 How can my team use Check-ins?
Here are a few examples of the more typical use cases we see from teams.
- Running asynchronous engineering standups
- Communicating regular progress on daily and project-based work
- Removing simple status updates from team meetings (to reduce time spent in meetings)
- Sharing daily and weekly progress reports (as an alternative to email)
- Running standups in Slack
To decide how you’d like to use Check-ins, consider what you’re hoping to get out of Range and then consider how your team currently works.
Range works best when it replaces or connects closely to an existing process. For example, if you’re struggling with finding a good time for a standup because of multiple time zones, you might replace your standup entirely with Check-ins. Or, if your team meeting is getting too long because of status updates, you might encourage the team to share a Check-in directly before team meetings.
In any case, the following questions can provide helpful guidance as you set up your workflow.
✍️ Exercise: Establish up your team’s workflow
These questions can help you identify how to set up Check-ins most effectively for your team. Write down your answers and hang onto them — we’ll come back to them again in module 2.
What’s our purpose for checking in with each other?
Examples:
- Decrease meeting load by eliminating our daily standup
- Help our remote team feel more aligned and connected
With that purpose in mind, how often should the team be checking in with each other?
Examples:
- Daily
- Mondays and Fridays
What time of day should we share?
Examples:
- Morning
- It doesn’t matter — the team can share on their own schedule
What info would be helpful to include?
Examples:
- The top thing we want to accomplish that day
- Anything folks need help on or the team should be aware of
- Progress toward a specific goal or project
When should we read others’ Check-ins?
Examples:
- Every afternoon
- Before the Tuesday team meeting
📅 Set your Check-in schedule
Your Check-in schedule dictates when teammates will be reminded to share their Check-ins and when they’ll receive a summary of Check-ins from the whole team.
From the team overview page you created in the previous step, you’ll notice some default settings already in place. If you stick with the default schedule, your team will get daily sharing reminders at 9:00 AM and receive a summary at 1:00 PM.
💡It doesn’t have to be daily
While many teams use Check-ins daily, you might find that another schedule — like Mondays and Fridays — better suits your team’s needs.
To adjust your Check-in schedule, click on “Team Settings” and then click “Edit” next to the displayed schedule. This will pull up the Check-in customization page — just unselect “Use the schedule from the workplace” to make changes.
[Insert GIF showing how this works]
You can adjust your schedule by days of the week, reminder and summary times, and, if your team is distributed, whether or not they’ll receive reminders all at once or staggered by timezone.
When you’re done, just click “Save schedule.”
Learn more about custom Check-in schedules✏️ Customize your Check-in prompts
Most teams stick to default prompts — at least to start — since they’re simple, effective, and easy to get the hang of.
Beyond the defaults, you can also set up custom Check-in prompts to collect information specifically tailored to your team’s needs. For instance, if your team’s purpose for checking in is to stay aligned leading up to a big product launch, you might want to create a custom prompt checking in around that specific initiative.
To add a new prompt, open the Team Settings page and click “Edit” next to Prompts. (You can also navigate here directly from the Check-in customization page.) Unselect “Use the prompts from the workspace” and then click “Add a new prompt.”
Each time you add a new prompt, you’ll be asked to fill in the following details.
- Flag or tag: Choose “Flag” for items that you want to call your team’s attention to. These items can be either urgent or important. Choose “Tag” for items that you want to be able to easily find and track over time.
- Prompt name: Pick a name by which you can easily identify the prompt should you want to make edits later.
- Schedule: Select the day of the week you want this prompt to show up in your team’s Check-ins.
- Check-in section: Choose where your prompt will appear in people’s Check-ins — either under the “My Plan” or “What happened.”
- Prompt text / supporting question: Finally, add relevant details/context that will help your team answer this prompt.
When you’re done, click “Add prompt.”

3. 🔌 Link Range to your other tools
If your team is like most, you probably use several tools to do work throughout the day. Range integrations help your team keep track of work — across all your tools — in one place.
To set up integrations for your team, head to Settings > Integrations.
Here, you’ll see a list of all the integrations Range supports (Slack, Microsoft Teams, Google Drive, Asana, GitHub, Jira, and many more) and can easily link the ones your team uses.
[Screenshot]
💭 How can my team use integrations?
Here are a few examples of how we see teams get the most out of integrations.
- Adding recently edited docs, completed tasks, and merged PRs to Check-in updates in just one click
- Connecting to Slack or Microsoft Teams allows folks to share updates and read updates in the place they’re already talking to each other.
- Linking project specs and roadmaps to daily updates ensures teammates and stakeholders have a complete picture of the what and the why
- Connecting Range to Zoom helps teams run more effective and engaging team meetings
Here’s an example of what your team’s Check-in experience might look like once you add integrations to the mix. Just a few clicks, and you’ve got a rich, contextual update.
[Screenshot]
💡One and done
Once you link them at the admin level, integrations Once integrations are connected on the workspace level, individual users will be able to click to connect their own accounts and start receiving work suggestions for their Check-ins.
🔗 Connect to Slack or Microsoft Teams
Most teams opt to connect Range to Slack or Microsoft Teams because it makes it even easier to stay aligned and share updates when you’re busy. Once connected, your team can receive Check-in reminders within Slack or Microsoft Teams and even share and read their updates there.
To connect Range to Slack, you’ll need help from your team’s Slack admin. From the Integrations page, have them navigate to the Slack icon and click “Set this up.”
To connect to Microsoft teams, follow the steps outlined here.
➕ Add the Range Chrome extension
In addition to native integrations, Range offers a Chrome extension that allows you easily capture work from your browser-based tools without OAuth or an appropriate API. Each teammate will need to add the extension to their own Chrome browser — they can install it here.
Don’t sweat it, we’ll remind you to share this with them later on. :)
Communication tools:
You can also build your own custom integration if that better serves you and your team.
Now that Range is all set up, it’s time to invite your team…
Next up: Getting your team onboard >